We may sometimes encounter the problem of the laptop not being able to connect to the internet via Wi-Fi or can't detect it, even though other devices are connected to WiFi from the same router that you are trying to connect to. So in this article we will give you all solutions that fix this problem in laptop devices which work in the Windows operating system, whether on Windows 10 or 11.
Note: All the solutions we will offer below work on all laptop brands, whether HP, Dell, Lenovo, or any other brand.
Fix my Laptop won't connect to WiFi issue:
1- Restart your Router:
The first intuitive step is to restart the router you are trying to connect to the WiFi network of, either by disconnecting its power plug or by pressing the power button. However, it is very important to note that you shouldn't turn on the router until after 30 seconds have passed, and personally I prefer to wait for 60 seconds, to ensure that any WiFi related issue is resolved.
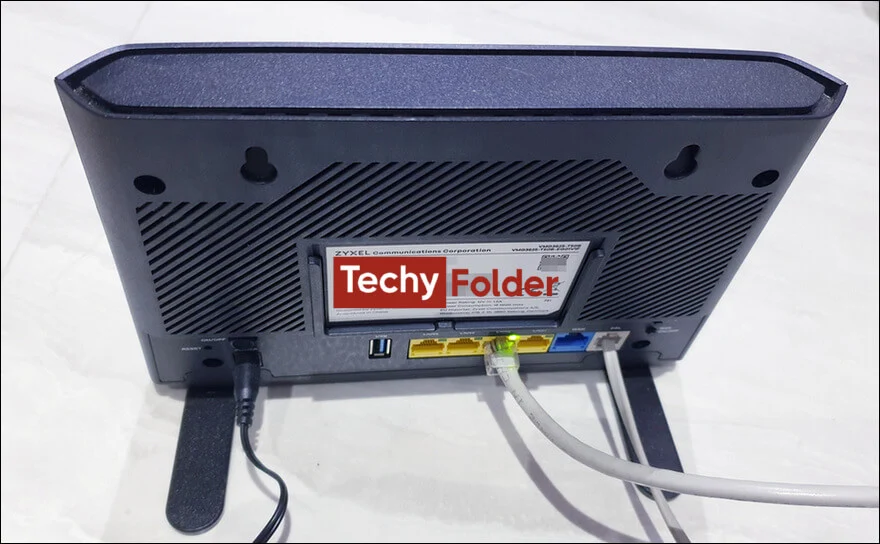
The idea is that when you restart the router, all devices connected to it will be assigned with a new IPs. So if the problem you have is that your laptop cannot use a specific IP, then the problem will be solved once the router is back up and running.
2- Run the internet troubleshooter:
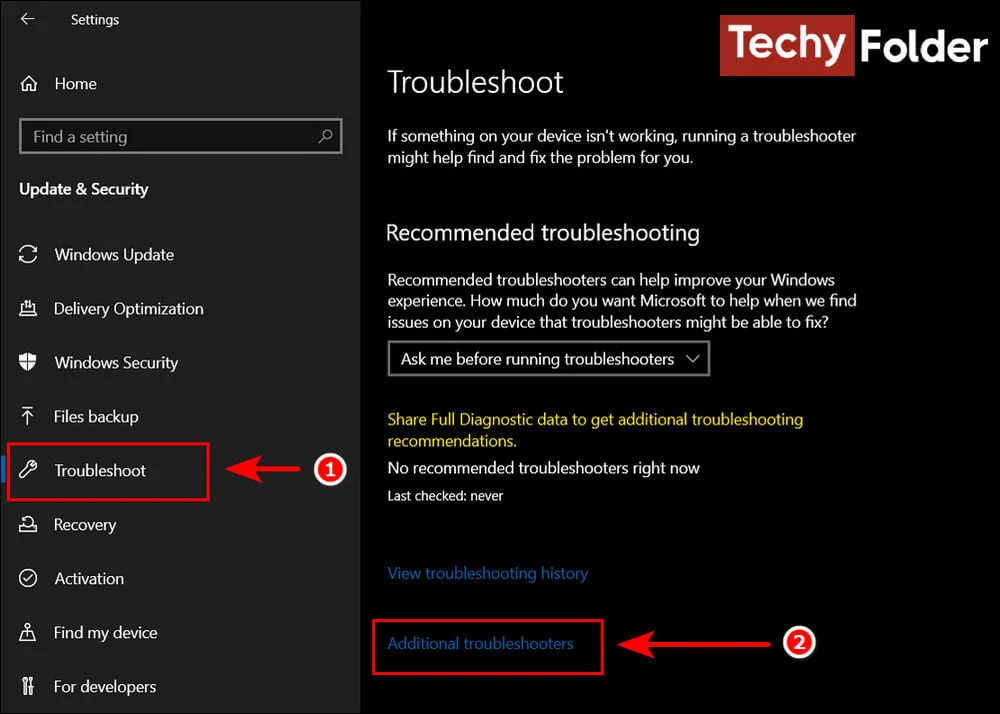
The second step is to run the troubleshooter tool which is integrated by default in Windows. This tool will help you to find the problem and will help you to fix it if it's possible. First, go to “Settings” by pressing the Windows key + ”I” button at the same time on your keyboard, and then click on the Update & Security section. After that click on “Troubleshoot” at the left side, and click on “Additional troubleshooters” option.
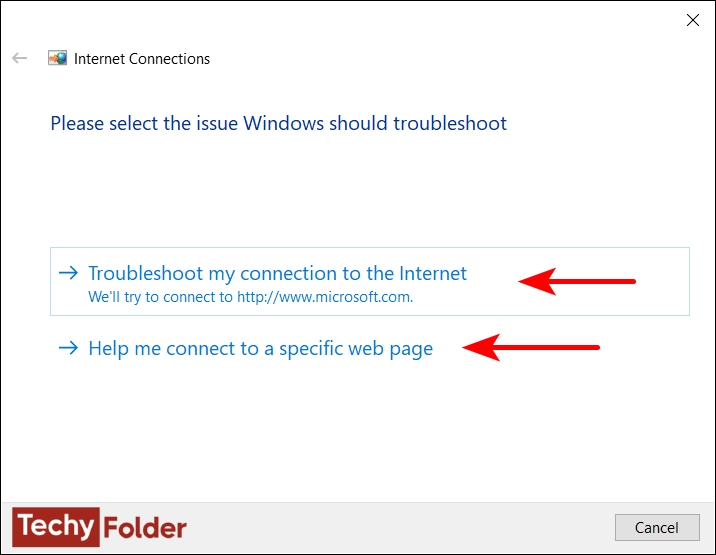
In the next window you will find some tools, but we need only to click on the “Internet Connections” tool, and then click on the “Run the troubleshooter” button.
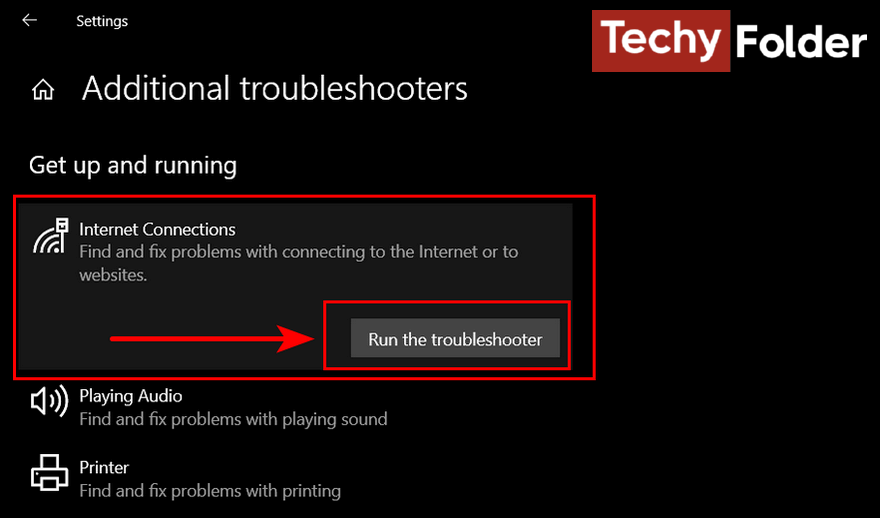
Then the “Internet Connection” window will be opened, so it will check your connection to the internet via WiFi and find the problem and fix it, or the tool will give you the reason for the problem only without solving it.
3- Make a Forget to the Wi-Fi network:
If the above two solutions don't fix the issue and the WiFi is still not working in your laptop, you must try to make a “Forget” to the WiFi network you try to connect to and then connect to this network again. This step you can do it in Windows 11 and 10 as the same, and its function is to delete all the settings of the Wi-Fi network you are trying to connect to, so you will deal with this network as if you are using it for the first time on your laptop, and you will enter its password to access it.
Follow these steps:
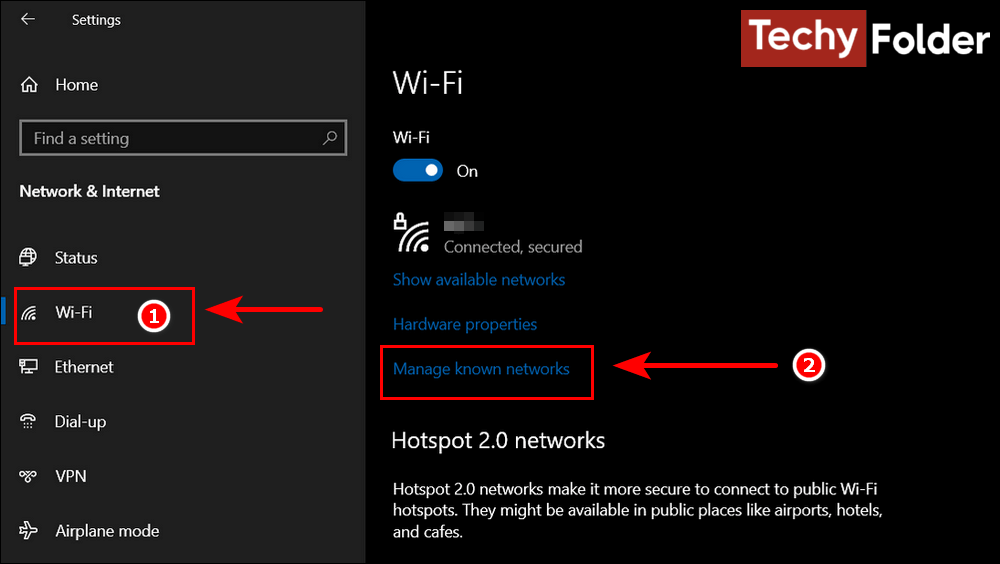
- Open the “Settings” app.
- Go to “Network & Internet”.
- Click on “Wi-Fi” from the sidebar.
- Click on the “Manage known networks” option.
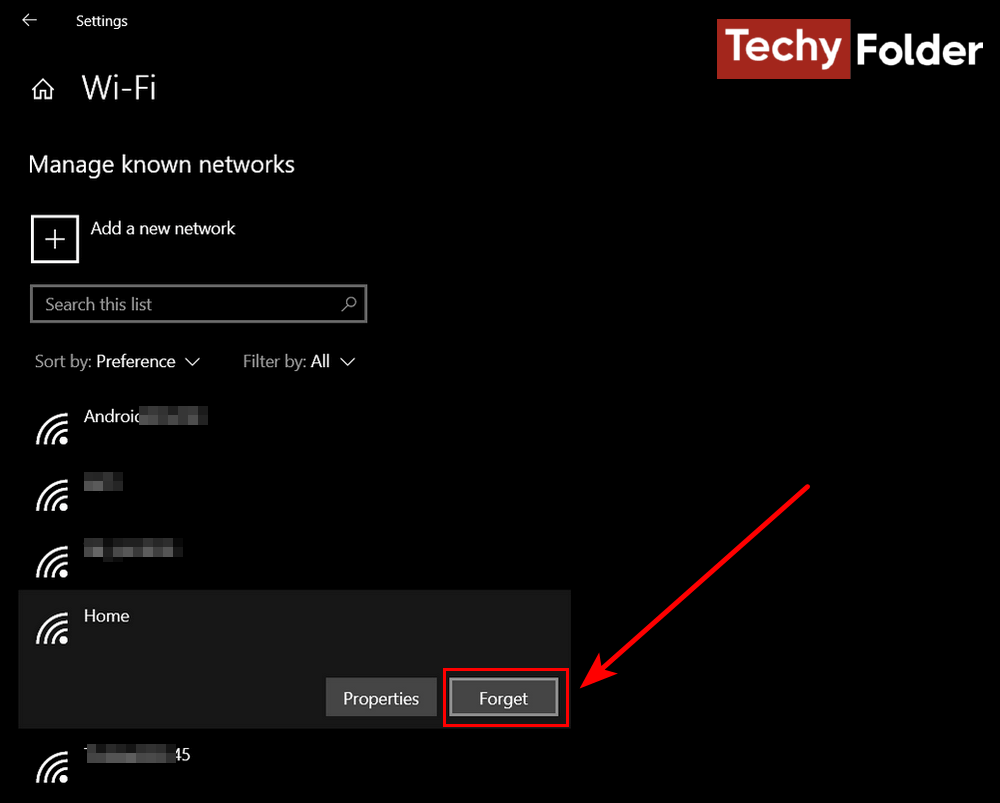
From the next window Select the WiFi network you can't connect to, and then click on the “Forget” button. The final is to reconnect to the WiFi network and enter its password.
4- Update the network adapter driver:
In some cases when WiFi stops working on laptops, the reason is a problem with the network driver, either the driver has stopped working completely or because you are using an old version of the driver. The solution here is to update the network driver responsible for running Wi-Fi on the laptop.
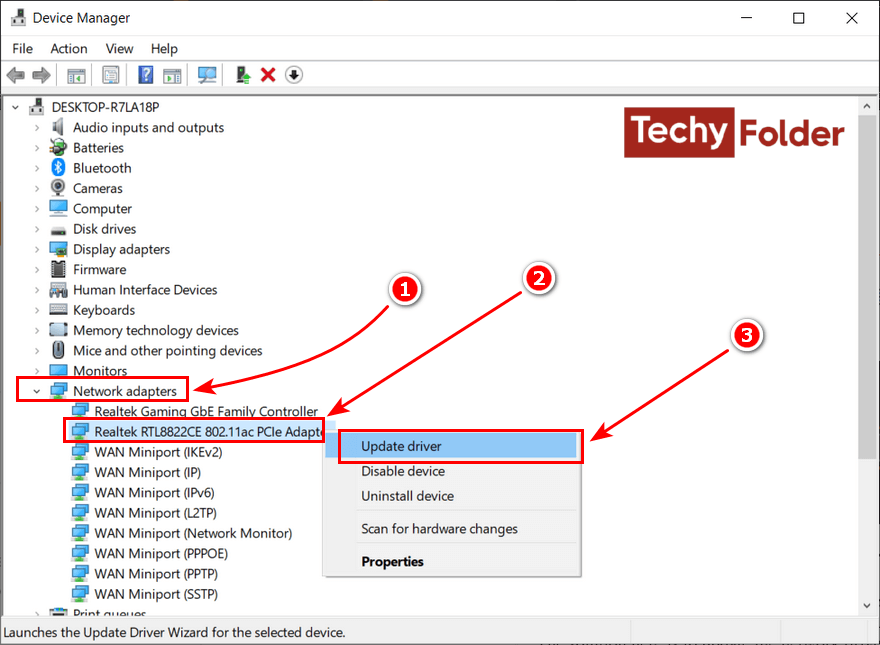
The update process is done through the Device Manager only, without the need to use external programs. All you have to do is click on the Windows key + the letter X on the keyboard together, and from the menu click on the “Device Manager” option. The Device Manager windows will be opened, and from it click on “Network adapters”, so all network drives will appear as you see below. What we need now is to right-click on the Wi-Fi driver “Wireless LAN”, and click on the “Update driver” option.
5- Uninstall the network adapter driver:
If you updated the driver but the problem isn't fixed, uninstall the network adapter driver from the Device Manager.
So, Instead of clicking on the “Update driver” option, click on “Uninstall device”. This will completely remove the WiFi driver from your laptop, but you must restart your computer in order to Windows reinstall the network driver.
6- Rest the Wi-Fi network:
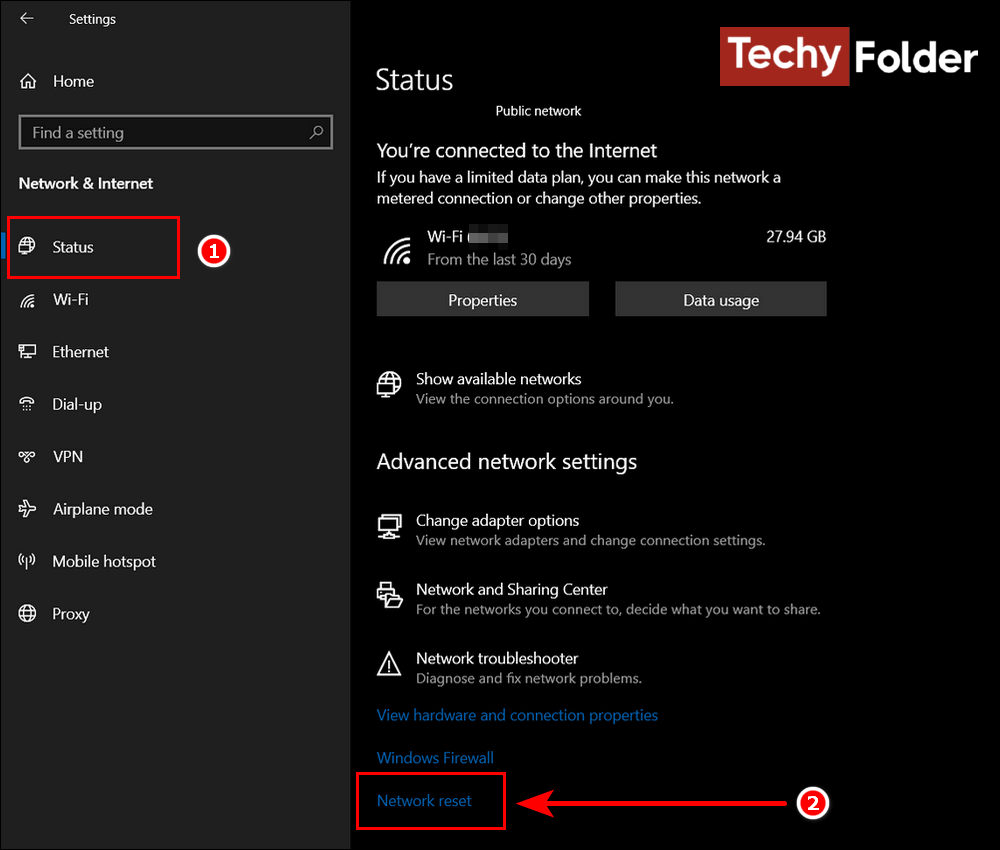
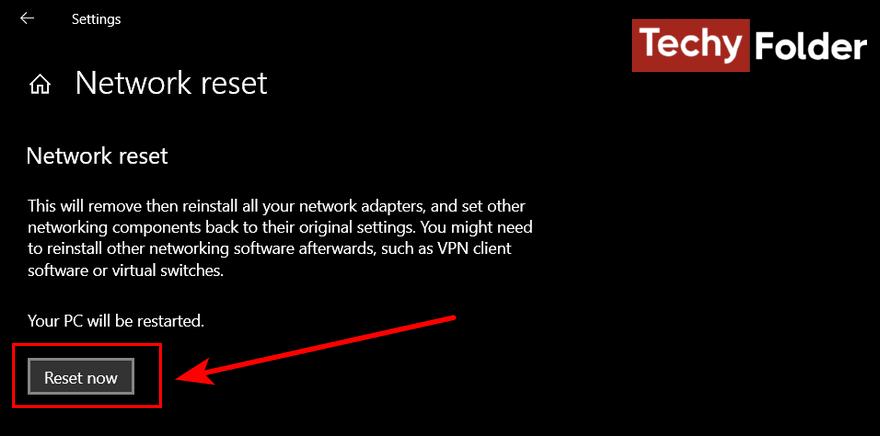
If all the previous solutions haven't fixed Wi-Fi connection problems on your laptop, you should perform a Reset to the WiFi network you are trying to connect to. This step will reinstall the network card driver and reset the network settings to the default.
First, go to “Settings”, then “Network & Internet”, and from the bottom of the window click on “Network reset” as you see in the next image.
In the next window click on the “Reset now” button, and then confirm by clicking on the “Yes” button. After that restart your device, and in most cases, you will find that the problem of not being able to connect to the WiFi network has been solved on your laptop.
Read More:
